Google Tag Manager Tracking Guide
Last updated: December 31, 2025
Complete guide to setting up tracking for GA4, Google Ads, and Meta Ads through Google Tag Manager, plus Google Search Console verification.
In This Guide
Install GA4 to track pageviews, sessions, and user counts
How do I track custom events in GA4?Track specific user actions like form submissions and purchases
How do I set up Google Ads conversion tracking?Track conversions from your Google Ads campaigns
How do I set up Meta Ads (Facebook) tracking?Install the Meta Pixel for Facebook and Instagram ads
How do I set up Google Search Console?Verify your site and monitor search performance
How do I create a cookie policy?Create a compliant cookie policy for analytics and tracking
How do I set up Google Analytics 4?
- Go to Google Analytics → Admin → Create Property
- Click through to create a web stream, name everything
www.yoursite.com - Copy your Measurement ID (e.g.,
G-TLD123456) - Go to Google Tag Manager → New Tag → select Google Tag (not Google Analytics)
- Paste your Measurement ID
- Click Preview to test
- Click Publish
How do I track custom events in GA4?
Custom events track specific user actions like form submissions or button clicks.
Create an event tag
- In GTM, go to Tags → New
- Click Tag Configuration → GA4 Event
- Enter your Measurement ID
- Enter an Event Name (use lowercase with underscores):
form_submitgenerate_leadpurchasebutton_click
Set up the trigger
- Click Triggering → New
- Choose trigger type (Form Submission, Click, etc.)
- Configure conditions (e.g., Page URL contains “/thank-you”)
- Save both trigger and tag
- Publish
Standard event names
| Event Name | When to Use |
|---|---|
generate_lead | Contact form submission |
purchase | Completed transaction |
sign_up | Account creation |
add_to_cart | Item added to cart |
How do I set up Google Ads conversion tracking?
Get your Conversion ID and Label
- Go to Google Ads
- Click Goals → Conversions → Summary
- Click + New conversion action → Website
- Select conversion type (Lead, Purchase, etc.)
- Choose Use Google Tag Manager
- Copy the Conversion ID and Conversion Label
Create the Google Ads tag in GTM
- In GTM, go to Tags → New
- Click Tag Configuration → Google Ads Conversion Tracking
- Enter your Conversion ID (e.g.,
AW-123456789) - Enter your Conversion Label (e.g.,
AbCdEfGhIjKlMnOp) - Optionally add conversion value and currency
Set up the conversion trigger
- Click Triggering → New
- Choose Page View trigger type
- Select Some Page Views
- Set condition: Page URL contains
/thank-you(or your confirmation page) - Name it “Thank You Page”
- Save and Publish
Add the Google Ads Linker (optional but recommended)
- Create a new tag → Google Ads Conversion Linker
- Set trigger to All Pages
- This enables cross-domain tracking and improves attribution
How do I set up Meta Ads (Facebook) tracking?
Get your Meta Pixel ID
- Go to Meta Events Manager
- Click Connect Data Sources → Web → Meta Pixel
- Name your pixel and click Create Pixel
- Choose Install code manually
- Copy your Pixel ID (15-16 digit number)
Create the Meta Pixel tag in GTM
- In GTM, go to Tags → New
- Click Tag Configuration → Custom HTML
- Paste this code (replace
YOUR_PIXEL_ID):
<script>
!function(f,b,e,v,n,t,s)
{if(f.fbq)return;n=f.fbq=function(){n.callMethod?
n.callMethod.apply(n,arguments):n.queue.push(arguments)};
if(!f._fbq)f._fbq=n;n.push=n;n.loaded=!0;n.version='2.0';
n.queue=[];t=b.createElement(e);t.async=!0;
t.src=v;s=b.getElementsByTagName(e)[0];
s.parentNode.insertBefore(t,s)}(window, document,'script',
'https://connect.facebook.net/en_US/fbevents.js');
fbq('init', 'YOUR_PIXEL_ID');
fbq('track', 'PageView');
</script>- Set trigger to All Pages
- Name it “Meta Pixel - Base”
- Save and Publish
Track Meta Ads conversions
- Create a new Custom HTML tag
- Add this code for lead tracking:
<script>
fbq('track', 'Lead');
</script>- Set trigger to your thank you page
- Save and Publish
Standard Meta events
| Event | When to Use |
|---|---|
Lead | Form submission |
Purchase | Completed sale |
AddToCart | Item added to cart |
InitiateCheckout | Checkout started |
Contact | Contact button click |
How do I set up Google Search Console?
Google Search Console monitors your site’s search performance and indexing status.
Verify your site
- Go to Google Search Console
- Click Add Property
- Choose URL prefix (e.g.,
https://example.com) - Select a verification method:
Verification options
| Method | Steps |
|---|---|
| HTML file | Download file → upload to public/ folder → deploy |
| HTML tag | Copy meta tag → add to <head> in layout |
| DNS record | Add TXT record to your domain’s DNS |
| Google Analytics | Auto-verifies if GA4 is installed |
Submit your sitemap
- After verification, go to Sitemaps in the left menu
- Enter your sitemap URL:
sitemap-index.xml - Click Submit
Monitor your site
- Performance: See clicks, impressions, and rankings
- Indexing: Check which pages are indexed
- Experience: Review Core Web Vitals
- Enhancements: Validate structured data
Fix common issues
| Issue | Solution |
|---|---|
| ”Not indexed” | Check robots.txt, add internal links |
| ”Crawled - not indexed” | Improve content quality |
| ”Blocked by robots.txt” | Update robots.txt rules |
| ”Redirect error” | Fix redirect chains |
How do I create a cookie policy?
If you’re using Google Analytics, Meta Pixel, or other tracking tools, you need a cookie policy and consent system to comply with privacy regulations like GDPR and CCPA.
What cookies do these tools set?
| Tool | Cookie Name | Purpose | Duration |
|---|---|---|---|
| Google Analytics | _ga | Distinguishes unique users | 2 years |
| Google Analytics | _ga_* | Maintains session state | 2 years |
| Google Ads | _gcl_au | Conversion linker | 90 days |
| Meta Pixel | _fbp | Tracks visits across sites | 90 days |
Build a cookie consent banner
Create a consent banner component (src/components/CookieConsent.astro) that:
- Shows on first visit with Accept All / Reject All / Customize options
- Settings modal with toggles for analytics cookies
- “Do Not Sell or Share My Personal Information” checkbox (CCPA requirement)
- Detects Global Privacy Control (GPC) browser signals and honors them automatically
- Stores preferences in localStorage
Example banner structure:
<div id="cookie-banner" class="fixed bottom-0 inset-x-0 bg-white shadow-lg p-4">
  <p>We use cookies to analyze site traffic.</p>
  <div class="flex gap-2">
    <button id="accept-all">Accept All</button>
    <button id="reject-all">Reject All</button>
    <button id="customize">Customize</button>
  </div>
</div>
Implement Google Consent Mode v2
In your base layout (src/layouts/BaseLayout.astro), set consent defaults before GTM loads:
<script>
  // Set defaults to denied before any tracking loads
  window.dataLayer = window.dataLayer || [];
  function gtag(){dataLayer.push(arguments);}

  gtag('consent', 'default', {
    'analytics_storage': 'denied',
    'ad_storage': 'denied',
    'ad_user_data': 'denied',
    'ad_personalization': 'denied'
  });
</script>
<!-- Then load GTM -->
When the user accepts cookies, update the consent state:
// When user accepts analytics cookies
gtag('consent', 'update', {
  'analytics_storage': 'granted'
});

// When user accepts advertising cookies
gtag('consent', 'update', {
  'ad_storage': 'granted',
  'ad_user_data': 'granted',
  'ad_personalization': 'granted'
});
Configure GTM for Consent Mode
In Google Tag Manager:
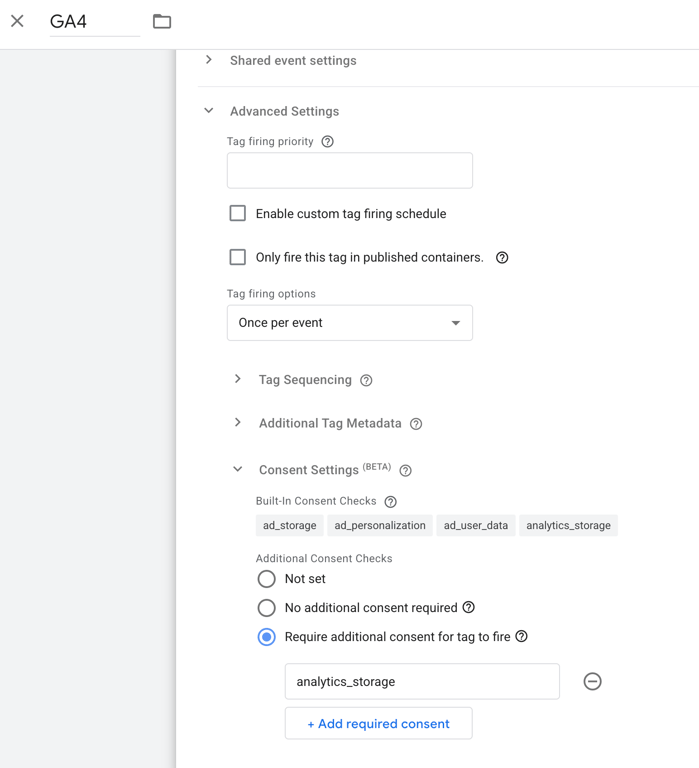
- Go to your GA4 Configuration tag → Advanced Settings → Consent Settings
- Check “Require additional consent for tag to fire”
- Add
analytics_storageas a required consent type - Repeat for Google Ads tags with
ad_storage
See GTM Consent Settings screenshot
Update your Privacy Policy
Your Privacy Policy page (src/pages/privacy.astro) should include:
- Cookie tables - Separate essential vs analytics cookies with names, purposes, and durations
- “Manage Cookie Preferences” button - Opens the consent settings modal
- California Privacy Rights (CCPA/CPRA) section covering:
- Right to Know what personal information is collected
- Right to Delete personal information
- Right to Correct inaccurate information
- Right to Opt-Out of sale/sharing of personal information
- Right to Non-Discrimination for exercising privacy rights
- How to submit privacy requests
- Categories of personal information collected
Add footer links
Include these links in your site footer (src/components/Footer.astro):
<a href="#" id="cookie-settings">Cookie Settings</a>
<a href="/privacy#california-privacy-rights">Do Not Sell My Info</a>
The “Cookie Settings” link should open the preferences modal. The “Do Not Sell My Info” link (required for CCPA) should jump to the California privacy section.
Detect Global Privacy Control (GPC)
Honor the GPC browser signal automatically:
// Check for GPC signal
if (navigator.globalPrivacyControl) {
  // User has opted out - treat as "reject all"
  gtag('consent', 'update', {
    'analytics_storage': 'denied',
    'ad_storage': 'denied'
  });
}
Checklist
- Cookie consent banner shows on first visit
- Settings modal with granular controls
- “Do Not Sell or Share” checkbox for CCPA
- GPC browser signal detection
- Consent Mode v2 defaults set before GTM
- GA4 tag requires
analytics_storageconsent - Privacy Policy has cookie tables
- Privacy Policy has CCPA section with all required rights
- Footer has “Cookie Settings” link
- Footer has “Do Not Sell My Info” link
Looking for expert guidance? Schedule a free consult:
Book a Free Consultation